Saturday, October 15, 2016

Kangaroo Tank WIP 2

WIP pics from the Kangaroo Tank project.  The hull and tracks are finished.  I chose a Commonwealth Armored Car crew for the diorama to represent the use of these tanks as reconnaissance vehicles.  I think is the best possible arrangement:  


I was able to recover from the two-tone paint job on display in those first two photos (Pro Tip: don't wait too long between painting sessions if you are painting the upper and lower hulls separately--even if you take good notes).  A coating of dry pigment fixed with a straight alcohol wash on the front slope and underside of the tank brought the two colors together without having to repaint the whole hull.


I'm pretty pleased with the dust effects on the roadwheels--concentrated near the rear of the track where the most dirt gets kicked up into the suspension and churned around.  The rear roadwheels and the idler wheels are normally where most of the dirt ends up, especially in dry, dusty conditions.  The downside is all the careful work I did to make the track tension adjuster on the idler wheel look like a track tension adjuster (I even made greasy streaks) is completely obliterated by dirt.  Oh well.  I'll have to show off that detail in a motor pool or maintenance diorama.


Next up: The crew.  Very daunting prospect as I have not painted 35mm figures since the 4th grade.  For those of you who don't know me, that was more than a long while ago.

Tuesday, September 27, 2016

Market Garden Campaign, Game 1 "September Snow: Arnhem"

Our gaming club ran a pretty neat game this past weekend using the opening fight for Arnhem on 17-18 September 1944 as the scenario.  I was the GM and John and Richard provided very high quality models for it.  Special mention must go to John's scratch-built table, which is without a doubt the best urban table I have played on in all my years.  It was super fun.

Richard provided a good write-up and some bangin' in-situ wargame photos over at his blog, here.

The game had two parts.  Part one (17 September 1944) was done on-line with the attacking team planning the routes and rate of march for the battalions of 1sts Para Brigade, along with the mounted reconnaissance squadron, from the landing zone to the bridge.  The defenders, meanwhile, developed a concept for Kampfgruppe Kraft in their initial defense west of Arnhem.


The results of this initial phase were interesting in several ways.  First, John Frost and 2nd Battalion never made it to the bridge, ending up (along with 1st battalion) on the eastern side of Oosterbeek, blocked by two companies of SS NCO students.  On the other hand, the reconnaissance squadron managed to avoid contact and made it to secure the Arnhem bridge (and this next part is really important for the campaign) before the 9th Pzr reconnaissance battalion crossed to go to Nijmegen.  Phase 1 and we have consigned the dustbin of history to the dustbin of history.

Part 2 (18 September 1944) was a tabletop fight pitting the 9th Pzr (reconnaissance) against elements of 3rd BN, 1st Brigade British Airborne.  It was, not surprisingly, a bloody house-to-house slog.  The challenges of urban combat were clear as the Germans ran into tenacious British Paratroopers the moment they entered the board.  The German forces had a considerable advantage in both numbers and firepower, but the psychological effect of not knowing where the Red Devils were hiding took its toll on the speed of the German advance.

After getting hung-up mid-game (exacerbated by a flare up of "never say die" from some bypassed paratroops in their rear), the Germans finally gained some momentum with successful coordinated attacks between their tanks and their infantry, but it came a little too late in the game and the British managed to retain control of the Bridge through sundown on the 18th of September.

There are plans to continue this campaign, but students of history will see that, unlike the events of history, this campaign is still very much in the balance going into September 19th.  Next up, the XXX Corps Breakout....

I will post more links to photos of the game as they come in.

Like now: UPDATE, John posted in-game pics here.  Enjoy.

Monday, September 12, 2016

Kangaroo Tank WIP

Been out of the net for a while.  Busy moving to a new house.  Here's a picture of Tiki Bob and a refreshing drink overlooking the woods behind my new house.

About two years ago, John challenged me to do a high-quality version of the Kangaroo Tanks (captured Italian M13/40) I made for our Tobruk Wargame.  I'm finally getting around to the project.  I selected the Tamiya 1/35 scale kit for no other reason than it was the one I could find.  It comes with kangaroo decals, but I have not yet decided whether I will use the decals or freehand the markings.

For starters, I have never made a 1/35 scale tank, and I did not know what to think about such a big model.  Having completed the first part of the project, I can say that I really like working in the large scale as it give me the ability to work in a lot of nuanced detail without overwhelming the model.


After the initial basecoats and some wash, I used a straightedge to replicate the scoring that you get on the sides of the hull from the treads.  I wanted to try also to replicate the wear you get from the track bouncing up and down as well, but could not make it work with the lateral scoring, so I just shaded the hull between the return rollers with a darker paint to suggest wear.


I love dioramas and terrain, so I bought some British armored vehicle crew models and am trying to think of a good vignette.  I originally wanted to have one of the crewmen painting a kangaroo on the side of the turret, but I'm afraid that exceeds my modeling expertise.


With 1/35 I get to make oil stains that don't look like a superfund site.  The wear and tear is so much more fun to do at this scale and looks so much better than paint chipping on smaller models.  Really enjoying this project so far.


Sunday, March 20, 2016

Cold Wars 2016

This weekend was the Cold Wars wargaming convention in Lancaster, PA.  As usual it was an awesome time.

My first game was Rorke's Drift in 15mm.  Very fun game.


The British eek out the narrowest of wins from inside the great redoubt.

Then I met a very nice corgi named Gizmo.


Then there was an American Revolution game with lots of booze.  Very beautiful table.


Then I met a very nice Irish wolfhound named Tyr.


Speaking of Irish, my Battle of Ashbourne went off without a hitch.  Ended in a draw.


Then it was back to the American Revolution with the Battle of Monmouth.  Another  fantastic looking table.


My final game of the con was a Normandy Bocage fight with John as the GM.  This was a very fun battle that played super close to tactical realism.  Here you can see the US company commander trying to flag down a platoon of Shermans.

Excellent time as always.  Already looking forward to Historicon.

Friday, March 11, 2016

Easter Rising: Battle of Ashbourne WIP

Making progress on the Fingal Volunteers and the RIC.  And some sheep, too, because what's an Irish countryside without meadow maggots?  Here's how it has gone down so far...


Finished the basecoat on the RIC.  Used Vallejo Heavy Black Green diluted 1:3 with Secret Weapon Black Green wash.  The results were too vibrant, so...


I hit the RIC uniforms with a liberal glaze of Secret Weapon Light Body Black wash.  That toned things down a little.  Also finished the Fingal Volunteers' hats using Light Body Black, Heavy Body Black, Concrete, and Stone washes. 


Finished the weapons with Vallejo Heavy Charcoal Grey and GW Chestnut Ink.


Washed the gunmetal with GW Black Ink and used a really cheap bulk Burnt Sienna acrylic, heavily diluted, to basecoat the bases.  Once these dry I will drybrush and flock them and call it good.


All I have left then is the Model T trucks for the RIC.  Looking like this game is going to happen next week at Cold Wars.

Saturday, February 27, 2016

Easter Rising: 100 Years Later

This being the 100th anniversary of the Easter Rising in Ireland, I thought I would make an Easter Rising game for Cold Wars.  I chose the Battle of Ashbourne.  A couple of key factors went into this decision.  First, it was a decisive Irish victory, so that makes it really attractive.  Secondly, and probably most importantly, the battle took place in a pretty rural setting, as opposed to the middle of Dublin, so the terrain challenge was not too steep.  Turns out that was a really good decision.

Last Summer I decided to go with Footsore Miniatures because they have a pretty decent line of Irish War of Independence miniatures.  The distributor and I ran into some challenges, and it took a really long time for me to get the minis, which was a little frustrating.  Fortunately, I got the minis a couple of weeks ago, so I'm all set, but with the compressed timeline I'm now up against the wall.  Thank the gods I don't have to build an urban board as well.


The forces for this game will be 44 Fingal Volunteers versus 28 RIC (actually 24 RIC and 4 British Regulars, because I just cannot run an IWI game without giving the Irish a chance to whack some Brits.)  The Volunteers will be regular troops and the RIC will be Veterans in an attempt to level the playing field.


The minis are pretty neat, but they have a lot of flash and flaws, way too much for me to deal with in time for Cold Wars.  SO I took an exacto to them to remove the big flash and obvious chunks, but I didn't have time to really clean all the lines off the minis.  That's just the way it is this time around.

Then the humidity set in and I waited a week before I could prime the damn things.  Tick tock.

Finally having the minis primed, I developed a palette for the IRA that would make them look fairly uniformly earthy, yet give a slightly chaotic look to the forces.  The RIC, of course, will be pretty standardized in their green uniforms.

Here's how it looks after an afternoon.  Got a lot of the Volunteers basecoated using Secret Weapon washes.  I'm using a speed painting technique I developed painting Irish and Hiberno-Norse forces for Saga that is washes painted directly onto white primer.  I'm pretty happy with the way they are looking.  Not sure how to paint the hats.  All shades of black, or various colors?

Any ideas?

Sunday, January 31, 2016

Battle of Amiens-Aussie Awesomeness!

It's a new year for awesome wargaming in the Tactical Gaming Society and we got off to a great start with Richard's presentation of the Battle of Amiens.  Using modified Bolt Action rules, Richard gave us some Great War action that involved an unusual amount of maneuver, much like the actual battle in 1918.

I'll leave the full BatRep to Richard.  Here I will focus on my portion of the battle-an Australian assault platoon on the right flank.  Comprised of four infantry sections and two tanks, we replicated the tough-as-nails quality of the Aussies by giving them the "Tough Fighters" special rule, which made them especially dangerous in close combat.

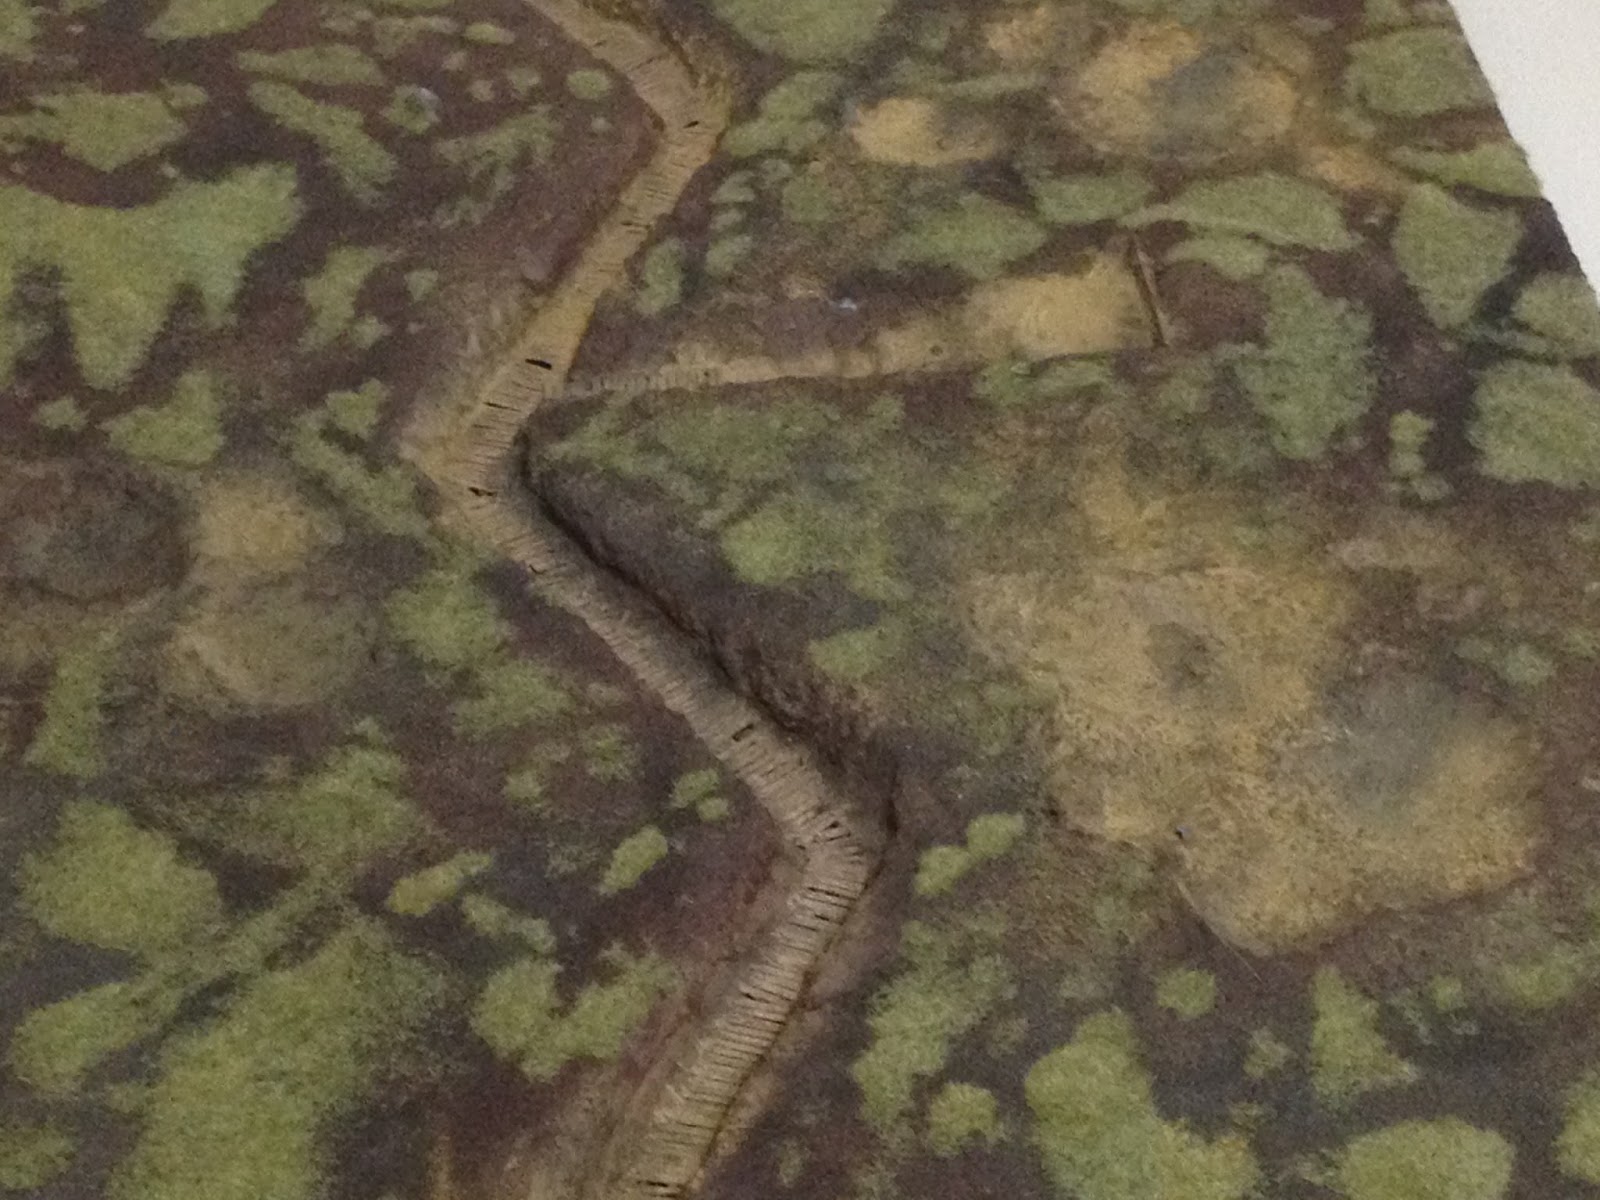
First things first.  Check out the awesome table that Richard made for the game.  His goal was to replicate the pastoral landscape of the Amiens battlefield, which was fairly unspoiled when compared with other more contended regions of the Western Front.  I'd call this success.  Check out the duckboarding.  Mindblowingly detailed.


A few fresh craters give a preview of things to come.


Here's my platoon.  Richard went with 18mm, which allowed us to play a company sized-game in a scale that made the battlefield look right.

Following a massive rolling artillery barrage.  I started by advancing my tanks on the right.

As the tanks prepared to knock holes in the barbed wire, I moved my infantry squads up and prepared to assault the first line of trenches.

Which they did with frightening efficiency.


Having brushed the German defenders aside in the first trench, the Aussies prepare to assault the second trench line.


Using a downed Sopwith Camel as a guide, the Aussies continue their advance across the alarmingly open ground.


The German artillery, having recovered from the Commonwealth bombardment, starts to gain hits against the Aussie tanks, disrupting the advance somewhat.


But no worries.  On the far right flank one squad uses a tank for cover to get within assault range of the second line of German trenches.


A German flamethrower team managed to set my lead tank alight, causing the crew to bail out, but the Infantry squad bypassed the burning wreck and gained the second trench line with another devastating assault.


The Germans tried to eject the hard-bitten Aussies from their new claim with machine gun fire, mortar fire, and counter assaults from two units.  Nothing would dislodge the Diggers now that their blood was up and they ended the game with the furthest advance of all commonwealth forces.  Kind of like it really went down in 1918.


A very very good game.  My teammates Gavin and Keith had a tougher go of things in the center and on the left, where a German MG and an improbably resilient flamethrower team had some good effects against tanks and infantry squads.  Speaking of a tough go, our valiant opponents, Casey, Rhett, and John had difficulties from the get go due to some hot artillery rolls on our part (which they were unable to match with their artillery rolls over the course of the game).  Had the German players the hotter dice, our advance would have been slowed significantly.

Great game.  It looked right, it played right, and it was a ton of fun with six very good players and a top-notch GM.  I really like playing with the smaller scale.  It looks much better than 28mm for this size battle.

Game well.